Objektverfolgung mithilfe des ESP32
Zuvor haben wir die Objektverfolgung mithilfe von PixyMon durchgeführt. Nun haben wir gelernt wie wir den Pixy2 über einen ESP32 ansteuern. Wir werden die Objektverfolgung also für den ESP32 programmieren.
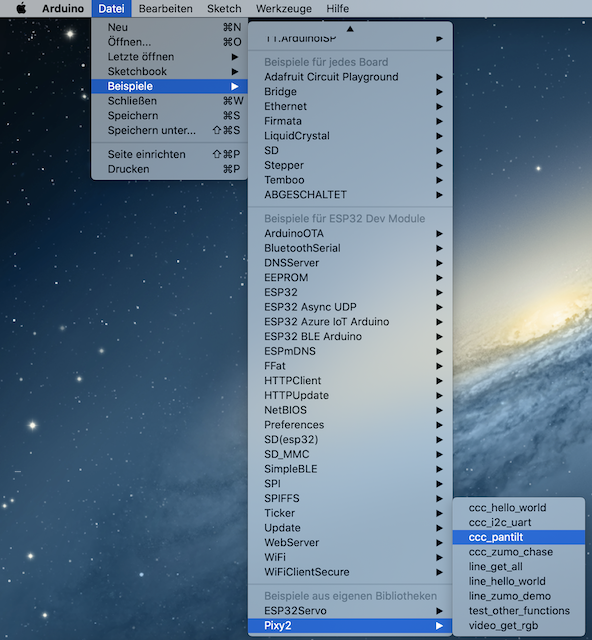
Bei der Objektverfolgung behelfen wir uns mit dem Beispielprogramm der Pixy2 Library ccc_pantilt. Öffnen kannst du dieses hier:

Bild: Pixy2 Pan/Tilt-Demo öffnen
Quelle: BBS2 Wolfsburg
Es sollte sich nun wie in den vorigen Kapiteln ein Arduino Fenster mit folgendem Quellcode öffnen:
//
// begin license header
//
// This file is part of Pixy CMUcam5 or "Pixy" for short
//
// All Pixy source code is provided under the terms of the
// GNU General Public License v2 (http://www.gnu.org/licenses/gpl-2.0.html).
// Those wishing to use Pixy source code, software and/or
// technologies under different licensing terms should contact us at
// cmucam@cs.cmu.edu. Such licensing terms are available for
// all portions of the Pixy codebase presented here.
//
// end license header
//

#include <Pixy2.h>
#include <PIDLoop.h>

Pixy2 pixy;
PIDLoop panLoop(400, 0, 400, true);
PIDLoop tiltLoop(500, 0, 500, true);

void setup()
{
  Serial.begin(115200);
  Serial.print("Starting...\n");

  // We need to initialize the pixy object
  pixy.init();
  // Use color connected components program for the pan tilt to track
  pixy.changeProg("color_connected_components");
}

void loop()
{
  static int i = 0;
  int j;
  char buf[64];
  int32_t panOffset, tiltOffset;

  // get active blocks from Pixy
  pixy.ccc.getBlocks();

  if (pixy.ccc.numBlocks)
  {
    i++;

    if (i%60==0)
      Serial.println(i);

    // calculate pan and tilt "errors" with respect to first object (blocks[0]),
    // which is the biggest object (they are sorted by size).
    panOffset = (int32_t)pixy.frameWidth/2 - (int32_t)pixy.ccc.blocks[0].m_x;
    tiltOffset = (int32_t)pixy.ccc.blocks[0].m_y - (int32_t)pixy.frameHeight/2;

    // update loops
    panLoop.update(panOffset);
    tiltLoop.update(tiltOffset);

    // set pan and tilt servos
    pixy.setServos(panLoop.m_command, tiltLoop.m_command);

#if 0 // for debugging
    sprintf(buf, "%ld %ld %ld %ld", rotateLoop.m_command, translateLoop.m_command, left, right);
    Serial.println(buf);
#endif

  }
  else // no object detected, go into reset state
  {
    panLoop.reset();
    tiltLoop.reset();
    pixy.setServos(panLoop.m_command, tiltLoop.m_command);
  }
}
Damit Pixy2 nicht immer sofort in die Grundeinstellung zurück geht, wenn er einmal kurz das Objekt nicht mehr erkennt, muss folgende Zeile auskommentiert werden:
//pixy.setServos(panLoop.m_command, tiltLoop.m_command);
Nun muss das Programm noch auf den ESP32 hochgeladen werden, dann kann Pixy2 deinem Objekt folgen:
Video: Arduino Pixy2 Pan/Tilt-Demo
Quelle: BBS2 Wolfsburg